

Want to make your windows pop? Hanging a curtain valance is An easy way to do it. It’s a quick and simple way to add style to any room. In this guide, I’ll show you how to hang a curtain valance in just A few simple steps. Whether you’re new to home décor Or looking for a small update, This will help you create a fresh look quickly. Let’s get started And make your space shine!
What Is a Curtain Valance and Why Should You Hang One?
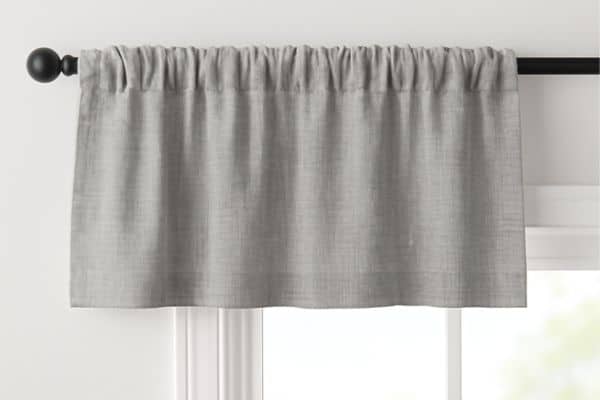
A curtain valance is a short fabric hanging at the top of your window. It adds style and completes the look of your room. Think of it like the finishing touch to your window treatments.
A works well alone or over existing curtains. It adds a clean, polished look without being too much. It’s perfect for anyone looking to update a room with minimal effort.
I’ve used them myself, And trust me, They make a big difference. It’s a small change that transforms a room. Whether you’re new to decorating or just want an easy update, Hanging a valance is a great way to improve your space.
Tools and Materials You’ll Need
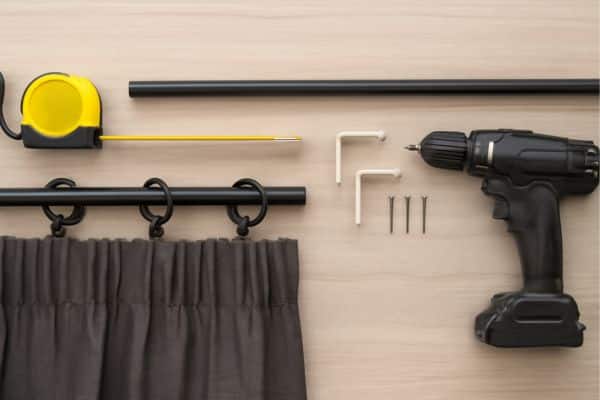
You’ll need a few basic tools:
- Measuring tape – For accurate measurements.
- Curtain rod – To hold the valance.
- Brackets – To mount the rod on the wall.
- Hooks or rings – For attaching the valance to the rod.
- Screws and drill – To secure the brackets properly.
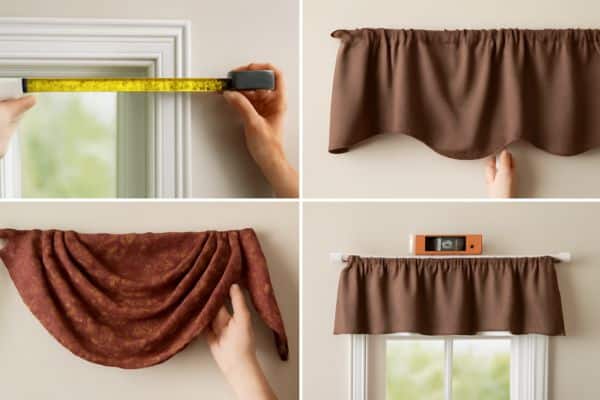
How to Measure Your Window for the Perfect Fit
Accurate measurements are important when hanging. They help ensure your valance fits perfectly and looks balanced. Proper measurements will save you time and avoid mistakes.
Here’s how to measure your window:
- Measure the width:
- Start at one side of the window frame.
- Measure across to the other side.
- Add 2-3 inches on each side for extra fullness.
- Start at one side of the window frame.
- Measure the height:
- Measure from the top of the window frame.
- Choose how high you want the valance to hang. Typically, it hangs 2-3 inches above the window frame.
- Measure from the top of the window frame.
01. Decide on the Rod Placement

First choose where you want to hang your curtain rod. You can install it just above the window frame or higher up on the wall. Hanging the rod up higher gives the appearance of taller windows, providing the illusion of more space in the room.
02. Install the Rod Brackets
Next, Install the rod brackets. Use a level to ensure they are straight. Make sure the brackets are securely attached to the wall, at the correct height, And wide enough to hold the curtain rod.
03. Attach the Valance
Now, It’s time to hang the valance. You can slide it onto a curtain rod, use hooks, Or slide it through a rod pocket, Depending on the style. Make sure the valance is evenly distributed along the rod.
04. Adjust for the Perfect Look
Finally, Adjust the valance to achieve the desired look. Smooth out any wrinkles And ensure the length is even. If you’re layering curtains, Like sheers with thicker drapes, how to layer curtains with one rod is simple. Just add the valance first, Then hang the other curtains behind it for a full, elegant look.
Tips for Layering Curtains with One Rod
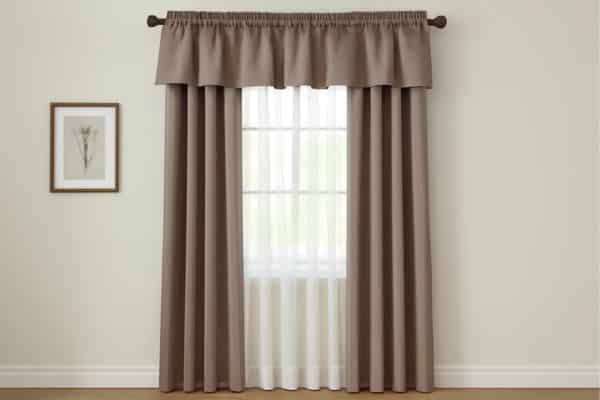
Layering curtains adds depth and style to your windows. By using different fabrics, You can create a fuller, more elegant look. It’s an easy way to make your window treatments stand out.
To layer curtains with one rod, Start with a valance at the top. Below it, Hang sheers for a light, airy feel. Then, add thicker drapes for privacy and warmth. Everything stays neatly on one rod for a clean, unified look.
Avoid mismatched fabrics. Stick to similar colors or complementary textures. Also, ensure the curtains are the right length to avoid bunching or dragging. Proper layering will enhance your room’s charm. For a more refined look, consider how long curtains should hang below window sill to achieve the perfect length and flow.
Different Types of Curtain Valances and When to Use Them
- Straight Valance: A simple, No-fuss design. It fits almost anywhere.
- Scalloped Valance: Features curved edges for a soft, Elegant look. It’s perfect for formal settings.
- Tie-Up Valance: Casual and fun, With fabric tied at the sides. Ideal for kitchens or cosy bedrooms.
- Swag Valance: Soft, flowing folds that create a dramatic look. Great for living rooms or dining areas.
Choosing the Right Valance
For a formal dining room, a scalloped or swag valance works best. For casual rooms, like a kitchen or bedroom, A tie-up brings comfort and charm. A straight suit suits any room style and is easy to use in any setting. Consider the mood of your room to pick the best valance style.
Common Mistakes to Avoid When Hanging a Curtain Valance
A few mistakes can spoil the look.
- Measure carefully: Incorrect measurements can make the valance too wide or too short. Always check your window’s dimensions before you start.
- Choose the right rod size: A rod that’s too small or weak will cause the to sag. Pick one that fits the width of your window and supports the fabric.
- Match the style: Choose a valance that fits your room’s mood. A formal may not suit a casual space.
Troubleshooting Tips
- For an uneven valence, check that your brackets are level.
- If it looks too tight or loose, adjust the rod or choose a different style.
- A valance that’s too short? Try moving the rod higher or selecting a longer one for better coverage.
Conclusion
Curtain valances are a simple way to add character to your room. It decorates your windows, adds beauty, and gives you a new and fresh sense of space. Whether you opt for a straight, simple valance or a more elaborate swag, it’s an easy change that makes a big difference.
Don’t you feel amazing now that you’ve learned how to hang a curtain valance? Keep in mind the steps shared. Follow the steps are you’ll soon have beautifully styled windows. It is high time to put a new dress on your windows!